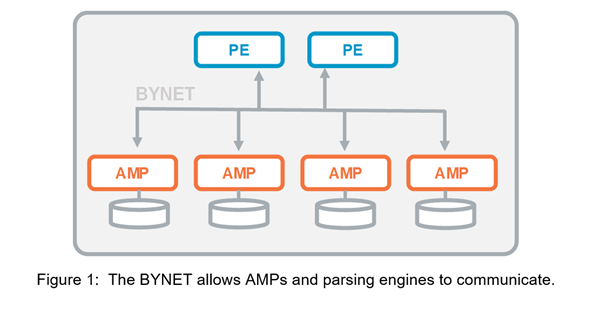
What is the BYNET?
The BYNET is the system interconnect that allows the various components of the Vantage database to communicate. This is important because Vantage is composed of many self-contained virtual processors with no inherent connection among them. Just like underground cables, messages travel along the BYNET between the parsing engine modules, which do all logon and query pre-processing activities, and the AMPs. AMPs are the virtual processes that run in parallel and do the database work involved in query executions. Typically, the data from a relational table is spread across all AMPs in the configuration, with each AMP owning a subset of a table's rows.
When I first started at Teradata, the YNet was the interconnect that glued all the physical components within the database together. The YNet was architected to offer a wide range of efficiencies, all of which have been inherited by today's BYNET, Teradata's second-generation interconnect.
Although primarily a message delivery mechanism, the BYNET, is so much more.
What is the BYNET and Why Is it Important to Vantage?
Teradata の AMP とは
アクセスモジュールプロセッサ(AMP)-仮想プロセッサ(vproc)と呼ばれるAMPは、実際にデータを保存および取得するものです。 AMPは、Parsing Engineからデータと実行計画を受け取り、データ型の変換、集約、フィルター、並べ替えを実行し、それらに関連付けられたディスクにデータを保存します。 テーブルのレコードは、システム内のAMPに均等に分散されます。 各AMPは、データが保存されるディスクのセットに関連付けられています。 そのAMPのみがディスクからデータを読み書きできます。
Teradata-architecture - Dev Guides
How do I know how many AMPs I have in Teradata?
What is function of an amp in Teradata? – MVOrganizing
HASHAMP function in Teradata The function returns the AMP number which will hold the table row in its vdisk. This AMP will be responsible for the portion of table rows which it stores in it vdisk. It takes HASHBUCKET# as the input and returns the AMP number.
How Teradata Data Distribution Works?
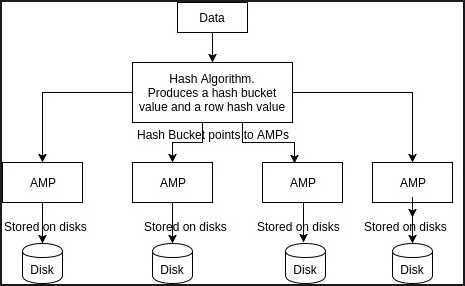
An index is a physical mechanism used to store and access the rows of a table. Indexes on tables in a relational database function much like indexes in books, they speed up information retrieval. The Teradata distributes the data based on the primary index (PI) that you create during table creation. Unique Primary Indexes (UPIs) guarantee uniform distribution of table rows across all AMP’s.When the client runs queries to insert records, Parsing engine sends the records to BYNET. The data is hashed using hash algorithm on Primary Index (PI). The hash algorithm produces hash bucket value and row hash value. Hash bucket value will be having AMP’s numbers. The BYNET sends the records to respective AMP’s based on Hashed values and AMP will intern store that in it’s associated disks.
Below picture depicts the actual data distribution in Teradata:
How Teradata Data Distribution Works on AMPs? - DWgeek.com
Teradata の AWT とは
AWTs are the smallest unit of work in Teradata. These are the tasks or execution threads inside of each AMP that get the database work done, such as executing a query step once the step is dispatched to the AMP. Each AMP has up to 80 AMP worker tasks available to them. AWTs can be increased from 80 if required, based on requirements and the size of the system.
Each request executing on a system may require more than 1 AWT to complete. Utilities tend to use more AWT per AMP because of their design. For example, a Fastload needs 3 AMP worker tasks in the first phase and one AMP worker task in the second phase.
AWT, are very critical and are always in demand, below is the break up of 80 AMP worker tasks:
- 24 AWTs are reserved for a special purpose
- 56 AWTs are general purpose
- A maximum of 50 AWTs can be used for Dispatched steps
- The normal case is 62 AWTs used for Dispatched steps and the first level of spawned work
It is important to understand what happens when AMP worker...
AMPワーカー タスク(AWT)は、データベース作業を行なう各AMP内のタスクです。この作業は、ユーザーのリクエスト、またはデッドロックの検出、エラー ロギング、アボートなどの内部ソフトウェアの機能に関連付けることができます。
各AMPには、スタートアップ時にAWTの数が与えられます。新しい作業が到着したときにすべてのAWTがビジー状態の場合、AWTが解放されるまで作業は待ち行列で待機します。
利用可能なAWTに基づくシステム イベントを作成することができます。イベントを作成するには、指定した利用可能なAWTの数が含まれるAMP数を指定します。例えば、2つのAMPそれぞれの利用可能なAWTが1つのみの場合に、利用可能なAWTシステム イベントをトリガーするように指定できます。利用可能なAWTを解釈する方法は2つあります。AWTは新しい作業または予約されていないプール全体に対してのみ予約されます。一般ビューのその他タブでサイトの利用可能なAWTを適切に定義することができます。ほとんどのシステムでは、新しい作業をサポートするために利用できるAWTは50に制限されます。
16.20 - 利用可能なAWT - Teradata Vantage NewSQL Engine - Teradata Workload Management
Teradata のスロットルについて
スロットル
スロットルはTeradata Asterシステムで一度に実行されるクエリー数を制限します。スロットルを作成するときに述語を指定します。述語には有効なSQL WHERE句を指定する必要があります。既存のUDF、SQL演算子、ワークロードの管理属性、およびANDやORの組み合わせを使用できます。同時並行性の上限を設定するには、特定の時点で実行できる、述語を照合するクエリーの最大数を指定します。各クエリーはシステムへの適用が許可される前に、すべての述語に合格する必要があります。この制限に達した後に実行依頼されたクエリーは実行待ちになります。スロットルは、では受け付け制限と記述されています。
以下に基づいてクエリーを制限するスロットルを作成できます。
- クライアントが接続されている特定のデータベース。
- 管理者ロールが許可されているユーザーなど、現在のユーザーがメンバーとなっている一連のデータベース ロール。
- SELECT、DROP、EXPLAIN、REVOKE、SHOWなどのステートメント タイプ。
- 経過時間。例えば、グループに属しているユーザーが特定のステートメントを30分以上実行している場合に、このステートメントを制限します。
16.20 - 16.50 - スロットル - Teradata Viewpoint - Teradata Workload Management
グローバルなスロットルは、クエリーの属性に関係なく、同時クエリーの最大数を指定された値に制限します。実行中のクエリー数が設定された値に達した場合は、新しいクエリーが実行待ちになります。グローバル スロットル制限に達していない場合は、通常のスロットル設定によって、クエリーがシステムに適用されるかどうか、および適用される時期が判別されます。グローバルなスロットルは、ではグローバルな受け付けしきい値と記述されています。
Teradata のプロファイルについて
プロファイルについて
プロファイルを作成すると、同じようなニーズを持つユーザーのグループに対してリソース パラメータを定義することができ、ユーザーごとに個別にリソース パラメータを定義せずに済みます。次に、CREATE USER文またはMODIFY USER文にプロファイルをリストして、各ユーザーのプロファイル内にメンバーシップを設定します。プロファイルは、ユーザーの種類に挙げられているようなプライマリ ユーザーの種類をベースにすることも、データベース リソース要件に照らしてユーザーをグループ化する他の要素をベースにすることもできます。
プロファイルを使って以下のようなパラメータを指定します。
- 一時領域とスプール領域の割り当て
- アカウント
- パスワード制御パラメータ
- デフォルトのデータベース割り当て
- クエリー バンド
(中略)
プロファイルの作成
1. 好みのクライアント ソフトウェアを開いて、SQLリクエストを作成します。例えば、次のようになります。CREATE PROFILE profile_name AS ACCOUNT = ('account_str1','account_str2') DEFAULT DATABASE = database_name, SPOOL = spool_space, PASSWORD = (EXPIRE = n_days, MAXLOGONATTEMPTS = attempts, LOCKEDUSEREXPIRE = n_minutes), QUERY_BAND = 'Pair_name=pair_value;' [NOT] DEFAULT';(中略)
次のようなCREATE USER文を実行します。
CREATE USER "GenUser1" FROM "DBADMIN"
AS PERM = 0
PASSWORD = "temp123"
STARTUP = ''
DEFAULT DATABASE = "Personnel_Views"
NO BEFORE JOURNAL
NO AFTER JOURNAL
PROFILE=”GenUser_Profile”;
16.20 - ユーザー プロファイルの作成 - Teradata Database - Teradata Vantage NewSQL Engine
CloudWatch アラームを AWS Chatbot 経由で Slack に通知する
CloudWatch アラームを AWS Chatbot から Slack に連携して通知してみた。
- CloudWatch アラームは Redshift への接続数 > 5 というシンプルなものにした
- SNS トピックは KMS カスタマー管理型キーで暗号化した(マネージドキーは Cloudwatch からアクセスできないため)

設定手順
KMSカスタマー管理型キーを作成する
CloudWatch からはマネージドキーにアクセスできないため(キーポリシーを編集できないため)、カスタマー管理型キーを作成する
- マネジメントコンソール -[KMS]-[カスタマー管理型のキー]-[キーの作成]をクリック
{
    "Version": "2012-10-17",
    "Id": "key-consolepolicy-3",
    "Statement": [
        {
            "Sid": "Enable IAM User Permissions",
            "Effect": "Allow",
            "Principal": {
                "AWS": "arn:aws:iam::123456789012:root"
            },
            "Action": "kms:*",
            "Resource": "*"
        },
        {
            "Effect": "Allow",
            "Principal": {
                "Service": "cloudwatch.amazonaws.com"
            },
            "Action": [
                "kms:Decrypt",
                "kms:GenerateDataKey*"
            ],
            "Resource": "*"
        }
    ]
}
SNS トピックを作成する
CloudWatch アラームから AWS Chatbot へイベントを中継するために SNS トピックを作成する。
- マネジメントコンソール -[Amazon SNS]-[トピック]-[SNSトピックの作成]をクリック
- トピック作成後に、[サブスクリプションの作成]をクリック
- プロトコル:Eメール
- エンドポイント:<メールアドレスを入力>
- 入力したメールアドレスにメールが届くので、本文の "Confirm subscription" のリンクをクリック
- サブスクリプションのステータスが[確認済]に変わる

CloudWatch アラームを作成する
Amazon Redshift のDB接続数を CloudWatch アラームで設定する。
- マネジメントコンソール -[CloudWatch]-[アラーム]-[アラーム状態]-[アラームの作成]をクリック
- メトリクス
- メトリクス名:DatabaseConnections
- ClusterIdentifier:awsredshift-redshift-cluster-2(選択した ClusterIdentifier)
- 統計:平均値
- 期間:1分
- 条件
- 通知
- アラーム名:awsredshift-redshift-cluster-2-DatabaseConnections-ALL
テスト
- Redshift に 6 本接続を張って、Slack に通知されることを確認した。
# plsql で 6 本接続する
$ psql "host=redshift-cluster-2.********.ap-northeast-1.redshift.amazonaws.com user=awsuser dbname=dev port=5439"
- アラーム状態になる。

- Slack に通知される。
