ablog

不器用で落着きのない技術者のメモ

VPCE Policy Of The Year

なるほどーと思ったのでメモ。ちゃむれおさん(c)。

# S3の暗号化方式 クロスアカウントアクセス VPCEポリシーによる制御
1 SSE-S3 (AES-256) X
2 SSE-KMS AWS/S3 X
3 SSE-KMS AWS/Custom
  • VPCエンドポイントポリシー
{
    "Version": "2008-10-17",
    "Statement": [
        {
            "Effect": "Allow",
            "Principal": "*",
            "Action": "s3:*",
            "Resource": "*"
        },
        {
            "Effect": "Deny",
            "Principal": "*",
            "Action": "s3:PutObject",
            "Resource": "*",
            "Condition": {
                "StringNotLike": {
                    "s3:x-amz-server-side-encryption-aws-kms-key-id": [
                        "arn:aws:kms:ap-northeast-1:123456789012:key/*",
                        "arn:aws:kms:ap-northeast-1:234567890123:key/*"
                    ]
                }
            }
        }
    ]
}
  • クロスアカウントアクセスを許可する KMS キーポリシー
{
    "Version": "2012-10-17",
    "Id": "test key policy",
    "Statement": [
        {
            "Sid": "Enable IAM User Permissions",
            "Effect": "Allow",
            "Principal": {
                "AWS": "arn:aws:iam::234567890123:root"
            },
            "Action": "kms:*",
            "Resource": "*"
        },
        {
            "Sid": "Enable IAM User Permissions",
            "Effect": "Allow",
            "Principal": {
                "AWS": "arn:aws:iam::123456789012:root"
            },
            "Action": [
                "kms:Encrypt",
                "kms:Decrypt",
                "kms:ReEncrypt*",
                "kms:GenerateDataKey*",
                "kms:DescribeKey"
            ],
            "Resource": "*"
        }
    ]
}

pgbench でカスタムクエリを実行する

準備

  • pgbench(PostgreSQL)をインストールする。
$ sudo yum -y install postgresql
$ sudo yum -y install postgresql-contrib
  • pgbench でデータを登録する。
$ pgbench -i -s 10000 -U awsuser -h aurora-postgres107.cluster-************.ap-northeast-1.rds.amazonaws.com -d postgres
  • 登録したデータを確認する。
$ psql "host=aurora-postgres107.cluster-************.ap-northeast-1.rds.amazonaws.com user=awsuser dbname=postgres port=5432”

aurora-postgres107 awsuser 23:54 => select count(1) from pgbench_accounts;
   count
------------
 1000000000
(1 row)

Time: 90621.247 ms

aurora-postgres107 awsuser 23:57 => \d pgbench_accounts
   Table "public.pgbench_accounts"
  Column  |     Type      | Modifiers
----------+---------------+-----------
 aid      | integer       | not null
 bid      | integer       |
 abalance | integer       |
 filler   | character(84) |
Indexes:
    "pgbench_accounts_pkey" PRIMARY KEY, btree (aid)
$ vi sort1.sql
select * from pgbench_accounts order by filler desc;

負荷をかける

$ export PGPASSWORD=********
$ nohup pgbench -r -c 1000 -j 100 -n -t 100 -f sort1.sql -U awsuser -h aurora-postgres107.cluster-************.ap-northeast-1.rds.amazonaws.com -d postgres -p 5432
  • ログをダウンロードする
$ aws rds describe-db-log-files --db-instance-identifier aurora-postgres107-instance-1|jq -r '.DescribeDBLogFiles[].LogFileName'|while read LINE
do
BASE_NAME=$(basename ${LINE})
aws rds download-db-log-file-portion --db-instance-identifier aurora-postgres107-instance-1 --log-file-name ${LINE} > ${BASE_NAME}
done
  • CloudWatchメトリクスを取得する
$ aws cloudwatch get-metric-statistics \
    --namespace "AWS/RDS" \
    --dimensions Name="DBInstanceIdentifier,Value=aurora-postgres106-instance-1" \
    --metric-name "FreeStorageSpace" \
    --statistics "Average" \
    --period 300 \
    --start-time "2019-10-05T00:00:00Z" \
    --end-time "2019-10-08T23:00:00Z" \
    --region ap-northeast-1

環境

$ aws rds describe-db-cluster-parameters --db-cluster-parameter-group-name aurora-postgres10-cluster --source user|jq -r '.Parameters[]|@text "\(.ParameterName):\(.ParameterValue):\(.Description)"'

autovacuum:1:Starts the autovacuum subprocess.
log_autovacuum_min_duration:0:(ms) Sets the minimum execution time above which autovacuum actions will be logged.
log_destination:csvlog:Sets the destination for server log output.
log_statement:all:Sets the type of statements logged.
log_statement_stats:1:Writes cumulative performance statistics to the server log.
rds.force_autovacuum_logging_level:debug5:See log messages related to autovacuum operations.
  • 変更したDBパラメータグループ
$ aws rds describe-db-parameters --db-parameter-group-name aurora-postgres10 --source user|jq -r '.Parameters[]|@text "\(.ParameterName):\(.ParameterValue):\(.Description)"'

log_connections:1:Logs each successful connection.
log_destination:csvlog:Sets the destination for server log output.
log_disconnections:1:Logs end of a session, including duration.
log_duration:1:Logs the duration of each completed SQL statement.
log_error_verbosity:verbose:Sets the verbosity of logged messages.
log_lock_waits:1:Logs long lock waits.
log_min_duration_statement:0:(ms) Sets the minimum execution time above which statements will be logged.
log_statement:all:Sets the type of statements logged.
log_statement_stats:1:Writes cumulative performance statistics to the server log.
log_temp_files:0:(kB) Log the use of temporary files larger than this number of kilobytes.

クロスアカウントS3バケット間コピー時にコピー元の CloudTrail に記録されるログ

クロスアカウントS3バケット間コピー時にコピー元AWSアカウントの CloudTrail にログに記録されるログを調べたメモ。コピー先アカウントの EC2 から AWS CLI(aws s3 cp) でオブジェクトをコピーしてコピー元アカウントの CloudTrail をダウンロードして jq を使って調べた*1

構成

  • コピー元アカウントID: 123456789123
  • コピー先アカウントID: 987654321098
  • コピー元アカウントのS3バケットポリシーでコピー先アカウントからのアクセスを許可
  • コピー先アカウントにEC2インスタンスを作成し、IAMポリシー"AmazonS3FullAccess"がアタッチされたIAMロールをアタッチ。

実行結果

  • バケットポリシーでアカウントID: 987654321098 にアクセス許可する。
{
    "Version": "2012-10-17",
    "Statement": [
        {
            "Sid": "Sample",
            "Effect": "Allow",
            "Principal": {
                "AWS": "arn:aws:iam::987654321098:root"
            },
            "Action": "s3:*",
            "Resource": [
                "arn:aws:s3:::test-cp-src",
                "arn:aws:s3:::test-cp-src/*"
            ]
        }
    ]
}
  • アカウントID: 987654321098 の EC2 からクロスアカウントS3バケット間コピーを実行する。
$ date;aws s3 cp s3://test-cp-src/1tb.dat s3://test-cp-dst/;date
Sat Oct  5 16:39:19 UTC 2019
Completed 764.1 GiB/1000.0 GiB (473.0 MiB/s) with 1 file(s) remaining
  • しばらくしてから、アカウントID: 123456789123 の CloudTrail を EC2 にダウンロードして、jq で調べてみる。
$ aws s3 cp --recursive s3://cloudtrail-awslogs-123456789123/AWSLogs/123456789123/CloudTrail/ap-northeast-1/2019/10/05/ ./
$ find . -print0|xargs -0 gunzip 
  • jq でアカウントID: 987654321098 から発行されたS3イベントを絞り込む
$ find . -name '*.json'|xargs -I{} -n1 cat {}|jq -r '.Records[]|select(.eventSource=="s3.amazonaws.com" and .userIdentity.accountId=="987654321098")'
(中略)
{
  "eventVersion": "1.05",
  "userIdentity": {
    "type": "AWSAccount",
    "principalId": "...",
    "accountId": "987654321098"
  },
  "eventTime": "2019-10-05T16:39:20Z",
  "eventSource": "s3.amazonaws.com",
  "eventName": "HeadObject",
  "awsRegion": "ap-northeast-1",
  "sourceIPAddress": "172.31.**.**",
  "userAgent": "[aws-cli/1.16.86 Python/2.7.14 Linux/4.14.77-81.59.amzn2.x86_64 botocore/1.12.76]",
  "requestParameters": {
    "bucketName": "test-cp-src",
    "Host": "test-cp-src.s3.ap-northeast-1.amazonaws.com",
    "key": "1tb.dat"
  },
  "responseElements": null,
  "additionalEventData": {
    "SignatureVersion": "SigV4",
    "CipherSuite": "ECDHE-RSA-AES128-GCM-SHA256",
    "bytesTransferredIn": 0,
    "AuthenticationMethod": "AuthHeader",
    "x-amz-id-2": "...",
    "bytesTransferredOut": 0
  },
  "requestID": "F705D7B2ADC4F70C",
  "eventID": "62fd88ce-5a22-44bf-9d18-31b94afe072b",
  "readOnly": true,
  "resources": [
    {
      "type": "AWS::S3::Object",
      "ARN": "arn:aws:s3:::test-cp-src/1tb.dat"
    },
    {
      "accountId": "123456789123",
      "type": "AWS::S3::Bucket",
      "ARN": "arn:aws:s3:::test-cp-src"
    }
  ],
  "eventType": "AwsApiCall",
  "recipientAccountId": "123456789123",
  "sharedEventID": "aeb733a0-4f11-4689-93d7-5027473e4ce0",
  "vpcEndpointId": "vpce-..."
}
  • jq で実行時間帯のイベントソースがS3のログを見てみる。
$ find . -name '*.json'|xargs -I{} -n1 cat {}|jq -r '.Records[]|select(.eventSource=="s3.amazonaws.com" and .awsRegion=="ap-northeast-1" and .eventTime > "2019-10-05T16:00")|@text "\(.eventTime)\t\(.eventName)\t\(.requestParameters.bucketName)\t\(.requestParameters.key)\t\(.sourceIPAddress)\t\(.sharedEventID)\t\(.requestID)"'|sort -k1
2019-10-05T16:39:20Z	HeadObject	test-cp-src	1tb.dat	172.31.**.**	aeb733a0-....-....-....-........4ce0	F7..............
2019-10-05T16:57:05Z	HeadBucket	test-cp-src	null	**.0.3.***	null	36..............
2019-10-05T16:57:05Z	HeadBucket	test-cp-src	null	**.0.3.***	null	83..............
2019-10-05T16:57:05Z	HeadBucket	test-cp-src	null	**.0.3.***	null	D4..............
2019-10-05T16:57:05Z	HeadBucket	test-cp-src	null	**.0.3.***	null	E9..............
2019-10-05T16:57:05Z	HeadBucket	test-cp-src	null	**.0.3.***	null	F5..............
2019-10-05T16:57:06Z	ListObjects	test-cp-src	null	**.0.3.***	null	E0..............

*1:Athenaでも検索できるが今回は json をダウンロードして jq で検索・整形した

AWS managed CMK はリージョンが異なると別の鍵

AWSサービスの AWS managed CMK はリージョンが異なると別の Customer Master Key になる。以下は DynamoDBの東京リージョンとバージニア北部リージョンのスクリーンショット、キーエイリアスは同じ aws/dynamodb だがキーIDは異なる。

  • 東京リージョンの aws/dynamodb


カスタマー管理の CMK も同様に他のリージョンに移動はできない。Bring Your Own Keys(BYOK)では同じ鍵を複数リージョンにインポート可能だが、データキーは異なるため、別リージョンのKMSで復号することはできない。


と思う(上記全てにかかる)。

Amazon DynamoDB Accelerator (DAX) のアラームで他アカウントのSNSトピックに通知できるか

DAX のアラームで他アカウントのSNSトピックに通知できることを確認したメモ。

セットアップ手順

DAX
$ cat <<EOF > dax-assume-role-policy-document.json
{
  "Version": "2012-10-17",
  "Statement": [
    {
      "Effect": "Allow",
      "Principal": {
        "Service": "dax.amazonaws.com"
      },
      "Action": "sts:AssumeRole"
    }
  ]
}
EOF
$ aws iam create-role --role-name DAXRole --assume-role-policy-document file://dax-assume-role-policy-document.json
$ aws iam attach-role-policy --role-name DAXRole --policy-arn arn:aws:iam::aws:policy/AmazonDynamoDBFullAccess
$ aws dax create-subnet-group --subnet-group-name dax-default-sg --subnet-ids subnet-f2****** subnet-02******
$ aws dax create-cluster --cluster-name dax-r4l-3nodes --node-type dax.r4.large --replication-factor 3 --subnet-group-name dax-default-sg --security-group-ids sg-85****** --iam-role-arn arn:aws:iam::123456789012:role/DAXRole
他アカウントでSNSトピック作成
  • SNSトピック作成
    • arn:aws:sns:ap-northeast-1:23457890123:dynamodb
  • 作成したSNSトピックで他アカウントからのアクセスを許可
{
  "Version": "2008-10-17",
  "Id": "__default_policy_ID",
  "Statement": [
    {
      "Sid": "__default_statement_ID",
      "Effect": "Allow",
      "Principal": {
        "AWS": "*"
      },
      "Action": [
        "SNS:GetTopicAttributes",
        "SNS:SetTopicAttributes",
        "SNS:AddPermission",
        "SNS:RemovePermission",
        "SNS:DeleteTopic",
        "SNS:Subscribe",
        "SNS:ListSubscriptionsByTopic",
        "SNS:Publish",
        "SNS:Receive"
      ],
      "Resource": "arn:aws:sns:ap-northeast-1:234567890123:dynamodb",
      "Condition": {
        "StringEquals": {
          "AWS:SourceOwner": [
            "123456789012",
            "234567890123"
          ]
        }
      }
    }
  ]
}
DAXのアラームを設定
  • DAXのアラームで他アカウントのSNSトピックのARNを指定

DAXにアクセスするアプリをセットアップ。

実行

  • DAXにアクセスするアプリを実行
$ export SDKVERSION=1.11.641
$ export DAX_HOME=/home/ec2-user/trydax
$ export CLASSPATH=.:$DAX_HOME/DaxJavaClient-latest.jar:$DAX_HOME/aws-java-sdk-$SDKVERSION/lib/aws-java-sdk-$SDKVERSION.jar:$DAX_HOME/aws-java-sdk-$SDKVERSION/third-party/lib/*
$ java TryDax dax-r4l-3nodes.******.clustercfg.dax.apne1.cache.amazonaws.com:8111
  • 以下のメールが届く
You are receiving this email because your Amazon CloudWatch Alarm "awsdax-dax-r4l-3nodes-High-" in the Asia Pacific (Tokyo) region has entered the ALARM state, because "Threshold Crossed: 1 datapoint [22251.0 (29/09/19 11:02:00)] was greater than or equal to the threshold (0.0)." at "Sunday 29 September, 2019 11:03:49 UTC".

View this alarm in the AWS Management Console:
https://ap-northeast-1.console.aws.amazon.com/cloudwatch/home?region=ap-northeast-1#s=Alarms&alarm=awsdax-dax-r4l-3nodes-High-

Alarm Details:
- Name:                       awsdax-dax-r4l-3nodes-High-
- Description:                
- State Change:               INSUFFICIENT_DATA -> ALARM
- Reason for State Change:    Threshold Crossed: 1 datapoint [22251.0 (29/09/19 11:02:00)] was greater than or equal to the threshold (0.0).
- Timestamp:                  Sunday 29 September, 2019 11:03:49 UTC
- AWS Account:                123456789012

Threshold:
- The alarm is in the ALARM state when the metric is GreaterThanOrEqualToThreshold 0.0 for 60 seconds.

Monitored Metric:
- MetricNamespace:                     AWS/DAX
- MetricName:                          TotalRequestCount
- Dimensions:                          [ClusterId = dax-r4l-3nodes]
- Period:                              60 seconds
- Statistic:                           Average
- Unit:                                not specified
- TreatMissingData:                    missing


State Change Actions:
- OK:
- ALARM: [arn:aws:sns:ap-northeast-1:23456789012:dynamodb]
- INSUFFICIENT_DATA:

Route53の特定HostedZoneしか変更できないIAMユーザーを作る

設定

  • IAMポリシー Route53HostedzoneAPolicy を作成する
    • ポリシーはテスト用に適当に作成しています。
{
    "Version": "2012-10-17",
    "Statement": [
        {
            "Sid": "AllowPublicHostedZonePermissions",
            "Effect": "Allow",
            "Action": [
                "route53:ListHostedZones",
                "route53:GetHostedZoneCount",
                "route53:ListHostedZonesByName",
                "route53:ListTrafficPolicies"
            ],
            "Resource": "*"
        },
        {
            "Sid": "AllowPublicHostedZonePermissions2",
            "Effect": "Allow",
            "Action": [
                "route53:UpdateHostedZoneComment",
                "route53:GetHostedZone",
                "route53:ChangeResourceRecordSets",
                "route53:ListResourceRecordSets"
            ],
            "Resource": "arn:aws:route53:::hostedzone/Z2**********0"
        },
        {
            "Sid": "AllowHealthCheckPermissions",
            "Effect": "Allow",
            "Action": [
                "route53:CreateHealthCheck",
                "route53:UpdateHealthCheck",
                "route53:GetHealthCheck",
                "route53:ListHealthChecks",
                "route53:DeleteHealthCheck",
                "route53:GetCheckerIpRanges",
                "route53:GetHealthCheckCount",
                "route53:GetHealthCheckStatus",
                "route53:GetHealthCheckLastFailureReason"
            ],
            "Resource": "*"
        }
    ]
}
  • IAMユーザー Route53User を作成し、Route53HostedzoneAPolicy をアタッチする

動作確認

  • マネジメントコンソールに IAMユーザー Route53User でログインする。
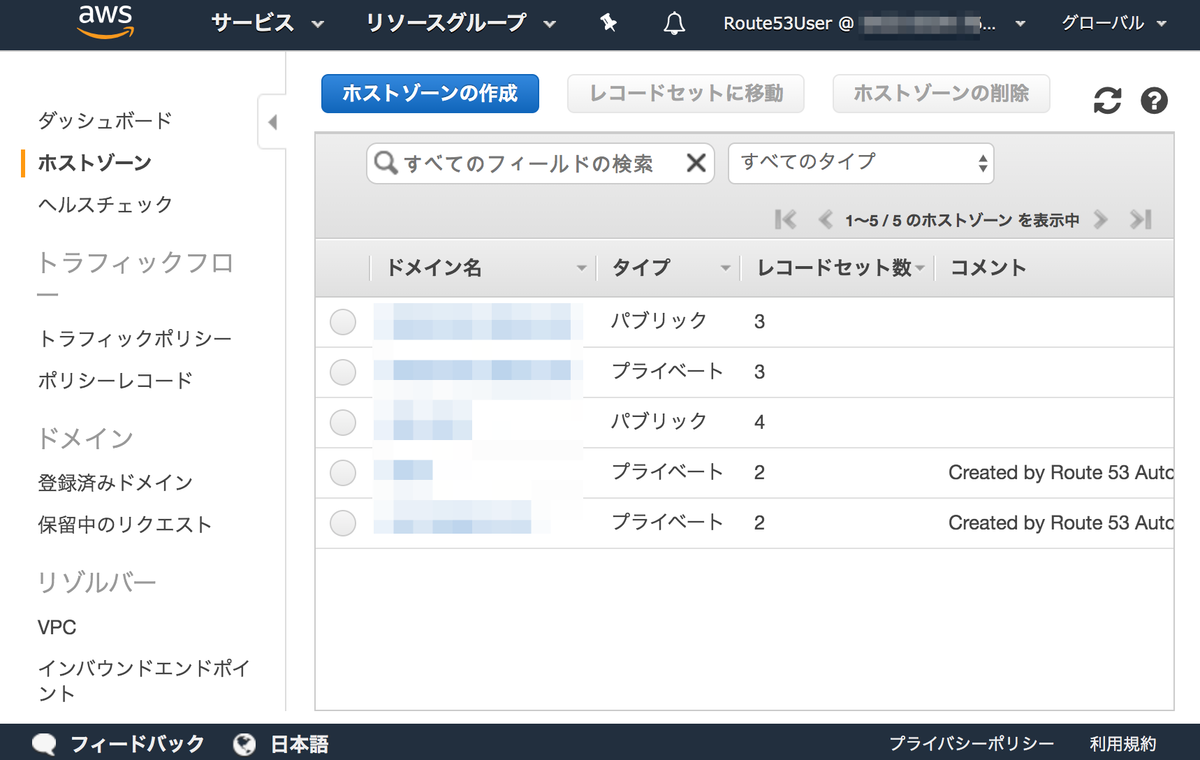
  • Route53 のホステッドゾーンを一覧表示する。

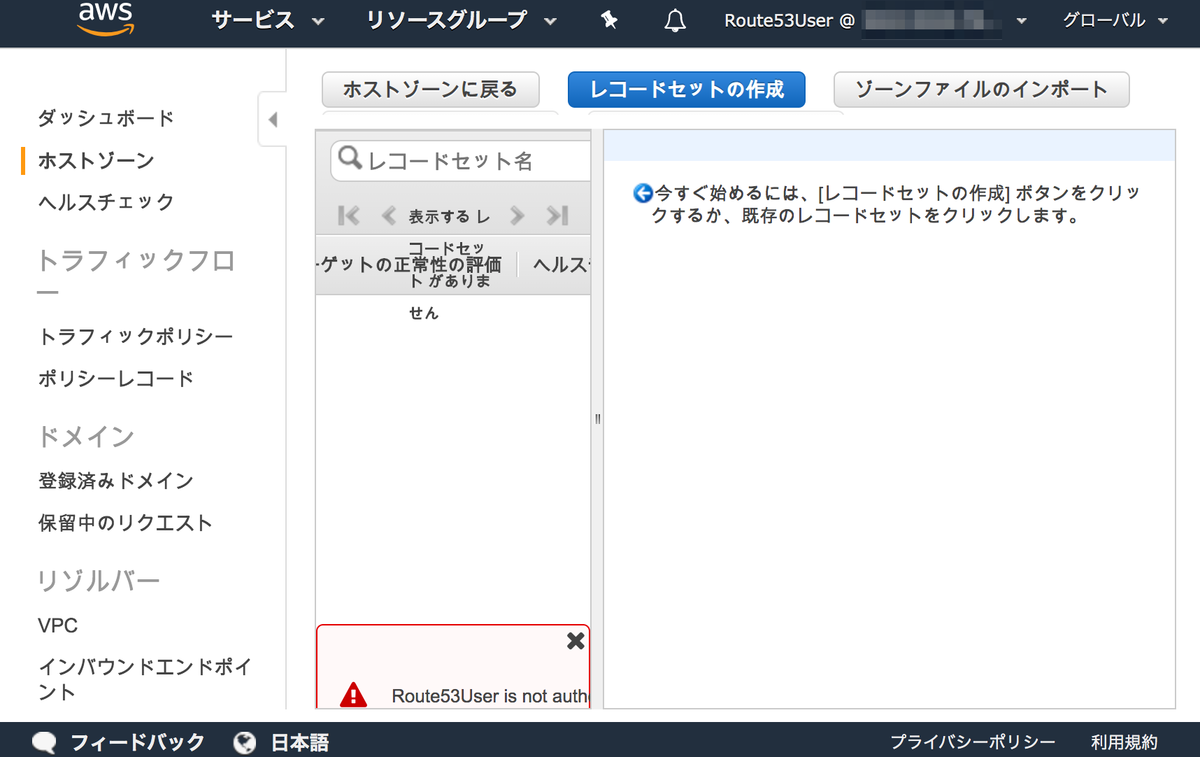
  • 許可しているホステッドゾーンは参照できる。

  • それ以外のホステッドゾーンは参照できない。

Amazon DynamoDB Accelerator (DAX) のサンプル Java アプリを動かしてみる

まずは動かしてみる

$ pwd
/home/ec2-user
$ mkdir trydax
$ cd trydax
$ sudo yum install -y java-devel
$ wget http://sdk-for-java.amazonwebservices.com/latest/aws-java-sdk.zip
$ unzip aws-java-sdk.zip
$ wget http://dax-sdk.s3-website-us-west-2.amazonaws.com/java/DaxJavaClient-latest.jar
$ wget http://docs.aws.amazon.com/amazondynamodb/latest/developerguide/samples/TryDax.zip
$ unzip TryDax.zip
$ export SDKVERSION=1.11.641 #aws-java-sdk-1.11.641などaws-java-sdk.zipを解凍したディレクトリ名でバージョンが分かる
$ export DAX_HOME=/home/ec2-user/trydax
$ export CLASSPATH=.:$DAX_HOME/DaxJavaClient-latest.jar:$DAX_HOME/aws-java-sdk-$SDKVERSION/lib/aws-java-sdk-$SDKVERSION.jar:$DAX_HOME/aws-java-sdk-$SDKVERSION/third-party/lib/*
$ javac TryDax*.java
  • 実行手順
    • DynamoDBエンドポイントにアクセス
$ java TryDax
    • DAXエンドポイントにアクセス
$ java TryDax dax-r4l-3nodes.******.clustercfg.dax.apne1.cache.amazonaws.com:8111

ちょっといじってみる

  • TryDax/java/TryDax.java を以下の通り編集
/**
 * Copyright 2010-2019 Amazon.com, Inc. or its affiliates. All Rights Reserved.
 *
 * This file is licensed under the Apache License, Version 2.0 (the "License").
 * You may not use this file except in compliance with the License. A copy of
 * the License is located at
 *
 * http://aws.amazon.com/apache2.0/
 *
 * This file is distributed on an "AS IS" BASIS, WITHOUT WARRANTIES OR
 * CONDITIONS OF ANY KIND, either express or implied. See the License for the
 * specific language governing permissions and limitations under the License.
*/
import com.amazonaws.services.dynamodbv2.document.DynamoDB;

public class TryDax {

    public static void main(String[] args) throws Exception {

        TryDaxHelper helper = new TryDaxHelper();
        TryDaxTests tests = new TryDaxTests();

        DynamoDB ddbClient = helper.getDynamoDBClient();
        DynamoDB daxClient = null;
        if (args.length >= 1) {
            daxClient = helper.getDaxClient(args[0]);
        }

        String tableName = "TryDaxTable";

        System.out.println("Creating table...");
        helper.createTable(tableName, ddbClient);
        System.out.println("Populating table...");
        helper.writeData(tableName, ddbClient, 10, 10);

        DynamoDB testClient = null;
        if (daxClient != null) {
            testClient = daxClient;
        } else {
            testClient = ddbClient;
        }

        System.out.println("Running GetItem, Scan, and Query tests...");
        System.out.println("First iteration of each test will result in cache misses");
        System.out.println("Next iterations are cache hits\n");

        // GetItem
        //tests.getItemTest(tableName, testClient, 1, 10, 5);
        tests.getItemTest(tableName, testClient, 1, 10, 1000); //★実行回数を5->1000に変更

        // Query
        tests.queryTest(tableName, testClient, 5, 2, 9, 1000); //★実行回数を5->1000に変更

        // Scan
        tests.scanTest(tableName, testClient, 100); //★実行回数を5->100に変更

        //helper.deleteTable(tableName, ddbClient); //★テーブルを削除しない
    }

}
$ javac TryDax*.java
$ java TryDax